Monday 30 September 2013

Barn board table

Not sure about where you are but we have been having some amazing fall weather lately. 
Yesterday while outside I took a deep breath and smelled fall. You know, that smell that has falling leaves and fresh air mixed together.
Makes me want to go out and rake leaves.
I'm sure I'll be doing a lot of that in the next couple of weeks. 
But till then I will open my workshop doors and enjoy these last few weeks before the rain and snow hits us. 
And I will take as many outside pictures as I can. 

Like this one. 

 This was taken a few months ago. I had picked up this table in hopes of redoing the solid wood top and painting the bottom.
I absolutely loved the legs and thought a bit of light paint and some distressing would go great on this piece. 
But like several of my projects that are not already spoken for it was pushed to the side of my workshop and it sat there till mid Aug. 
One of our neighbours came over and was rooting around in all the unclaimed furniture when she spied this table. 
We talked about what she wanted (she needed a new table) We talked about options and came up with a plan. 
This is the end result.
 Barn Board!
This process is not for the faint of heart. 
I literally had to go to a guys field and pick out the barn board. Not fun when you are looking to find a few to make a table and they were not all in the best of shape. 
And to top it off, it was raining while I was doing it. (lol) So picture me with a farmer in the middle of a field full of barn boards in the rain separating a few hundred boards to find enough that were not warped, split or had to many holes in them.
I then had to stack them with blocks of wood between layers to let them dry. 
Then off to my father in laws to get them planed. He's been great! And I love that I can just call him up anytime to use some of his tools when I need them. How wonderful to have a highly trained cabinet maker in the family :)
 We cut the middle section out from the table base and painted it "French Vanilla" then distressed it.

 Just look at that top. 6 coats of highly durable varnish! Sanding between coats to make it come out as smooth as glass. 
I love it. 
The neighbour will pick it up next weekend. 
At which point we will discuss colours for this.
She doesn't want the mirror and I think she may go with a grey...ohhh what fun :) 

Sharing here:
Knick of Time Interiors
Farmhouse Porch 
Coastal Charm 
Elizabeth and Co 
Savvy Southern Style 
Domestically Speaking 
36th Avenue 
  Miss Mustard Seed

Wednesday 25 September 2013

Tale of Two card Catalogs

I'm telling you I am completely blessed.

You see a couple of weeks ago I was busy working at the cottage and my sister sent me a picture. I don't have the picture anymore but I'm telling you my heart was beating a bit faster.

This is my nephew as we were ready to load these in my truck
My sister found them at a Re store and asked me if I was interested. Well DAAA of course I was. :)
Thankfully she was able to take them home with her and I was there two mornings later to pick them up. Thanks Zach for hauling them home for me in your truck!

Both of them were spoken for by the end of the day and work got under way by the end of that week.
Both of them are going to very crafty ladies who will use them in their home based business's.
The first person wanted a cream colour, the base removed and industrial type casters added.
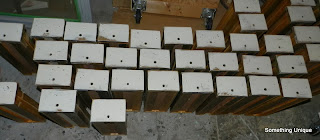
 Going to take you through the process just a bit. First I had to removed all 80 drawers...yes you heard that right. Each unit has 40 drawers.
 Everything had to come off. Some to be saved and re used, some to be tossed.
 The bottoms all came off. The steel parts anyway.

It was all taken to the recyclers. 
 All the fronts were cleaned then sanded to remove the final bits of paper and glue that didn't come off with simple cleaning.
 Then new bottoms were cut and glued into each drawer
 That bottom base was removed from one of the units (according to what the new owner wanted)
Then it was all stacked to dry. 
 Then the rods that went through the front of each drawer had to be altered by my wonderful hubby :)
 A new base was built and casters added.
 Each drawer was painted and set to dry.
 Everything distressed to make it look old and worn once again.
 And all that lovely solid brass hardware was cleaned and put back in place.
 And here she is complete. I am waiting for a picture in her new home though.

 I think she turned out perfectly.


The second one had very much the same kind of makeover. 
By the time I started on that one, the drawers were already ready for paint. 
The second owner however didn't want cream...she wanted a combination of blue and green. 
She also didn't want to lose the base. 

I did cut a bit off the base. If you look back at the first picture you can see a black bottom on it. It actually went in a bit and had that nasty black plastic wrapped around it. So that was lost and a new base added along with some lovely new legs. The veneer on the top was removed because it was in bad shape. I should mention the veneer was removed from the first one as well. 
I should have taken pics between coats of paint but I didn't :( 
This is how the second one turned out. 
 I'm sorry the pics were taken inside my garage late at night. I wanted to get pics to the new owner before I left in the morning and this was my only chance :(
 See the two tones? Don't you just love it?

All that lovely brass just sets the whole thing off :) I can't wait for her to see it all in person. 

Phew I'm tired. 
My husband asked me tonight as I was sliding the last drawer in place. "I bet you don't want to see another card catalog in a long time eh?" 
What? seriously? I would do another 100 of these if I had the chance. Ok, maybe not tomorrow, but I'll be game next week again...lol 

anyone know where I can get more? 


Monday 23 September 2013

Mustard Yellow dresser

It's getting towards the end of September and I haven't blogged in a LONG time. 
Initially I thought I would take the month of Aug off in order to focus more of my time on actually putting a few really special projects together and getting out the door some of the things that were piling up in my workshop. 
But as so many things go..the more focused I became on doing that, the less I thought about blogging, till it was late at night. 
BUT I"M BACK! 
And I promise to share more here and I will try to have more of a balanced life between work and blog. 
So lets get started shall we? 


 A while back I picked up this wonderful antique dresser..or is it vintage? Actually I don't care. I just loved it. And so I brought it home with me. But as with so many things..I don't have a "before" picture. I know I"m bad..sigh, trust me I'm more mad at me right now than you are. BUT I do have after pics. My mustard yellow dresser! 

This one flew out the door so quickly I don't even remember why I painted the top. 
Hope you enjoy the pictures and stay tuned, I have so much to share I may be posting once a day till I get caught up :)